
You need at least WordPress version 6.0+ installed for this theme to work properly. It is strongly recommended that you always use the latest stable version of Wordpress to ensure all known bugs and security issues are fixed. Other requirements:
PHP - PHP version 7+ or greater. But for maximum speed, we recommend to use PHP version 8+.
MySQL - MySQL version 5.0.15 or greater.
Since WordPress is constantly being updated information about how to install WordPress may become out of date, so you always can read official guide here.
Below are all the useful links for WordPress information:
WordPress theme is simply a group of files, called template, bundled together that, when activated in CMS, determine the look and basic function of your site. By using professional modinatheme theme, you can have your site up and running with a new design - pretty fast. Theme installation is very easy process. Especially when you've chosen the theme you want to use, you'll need to install it into your WordPress website. You'll have the following two choices, as you did when adding new plugins:
You can add the theme directly from within the WP Admin, using Upload Theme option. From Admin Panel go the following path Appearance - Themes - Add New - Upload Theme and select the
photogam.zip archive, then click Install Now. Once the theme is fully uploaded and installed, click Activate to activate the WordPress theme.
If your server is not set up properly or you have any problems, you'll have to extract and then upload the theme by hand. Using your favorite FTP client tool upload theme folder into the folder path /wp-content/themes/ on your server and active it from admin panel.
Note: On your WordPress site, the wp-content/themes folder holds all your themes. Each theme you install gets its own subfolder. All of a theme's style sheets and template files reside inside the theme's folder.
If you try to install the wrong files, you will get the missing styles.css error. This is the most common error that means you are trying to install an incorrect package.
Once your theme is installed, you will notice a message at the top of your dashboard prompting you to install certain plugins. To ensure that your site has all of the same functionality that you see in the demo, it’s important that you install and activate these plugins.
| Plugin | Description |
|---|---|
| Photogam Theme Pack | Core features (portfolio, metaboxes, widgets) |
| Elementor | Page builder |
| Contact Form 7 | Contact form support |
| Mailchimp for WP | Newsletter subscription |
| One Click Demo Import | Import demo content |
You can install them automatically via the notice or manually in Appearance - Install Plugins.
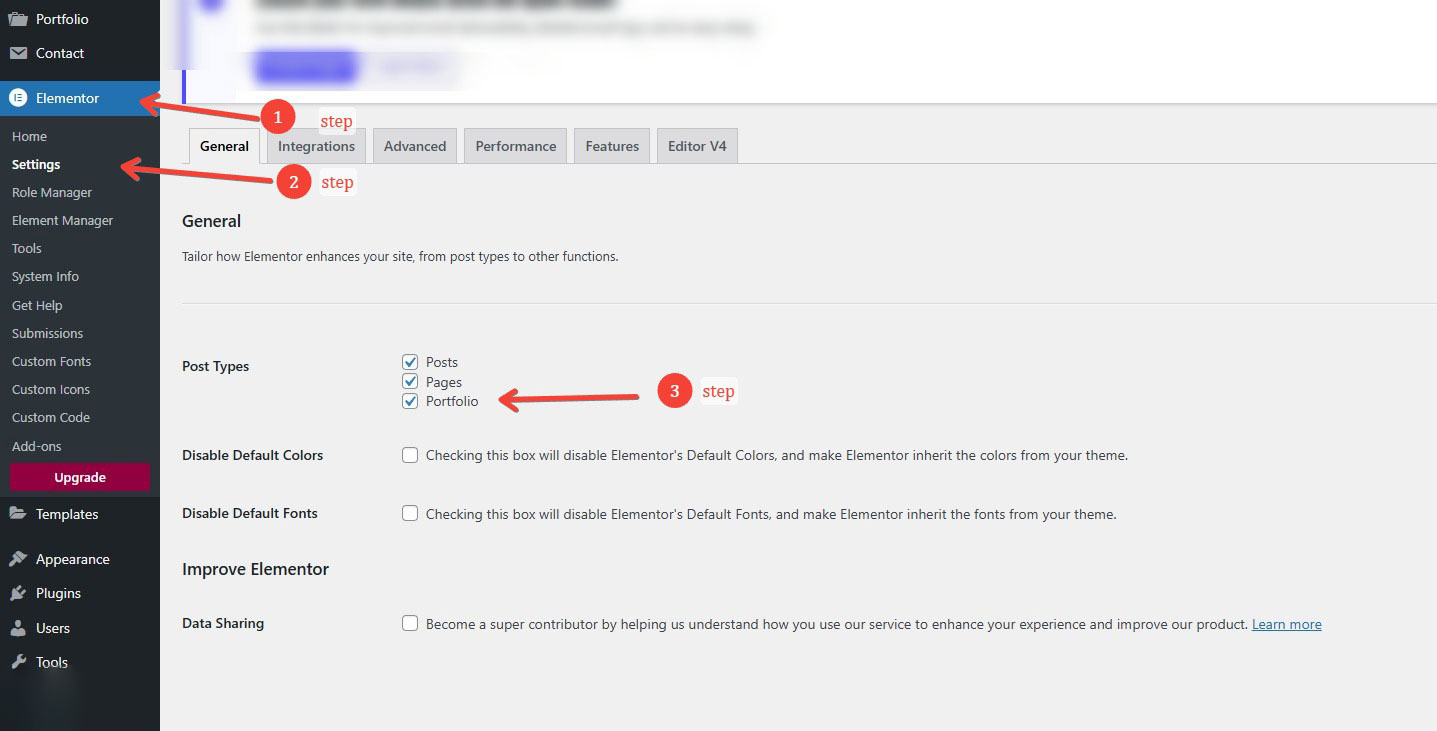
After installing and activating the plugins, you need to do one more thing. Go to: Elementor - settings - acivate Post Types "portfolio".
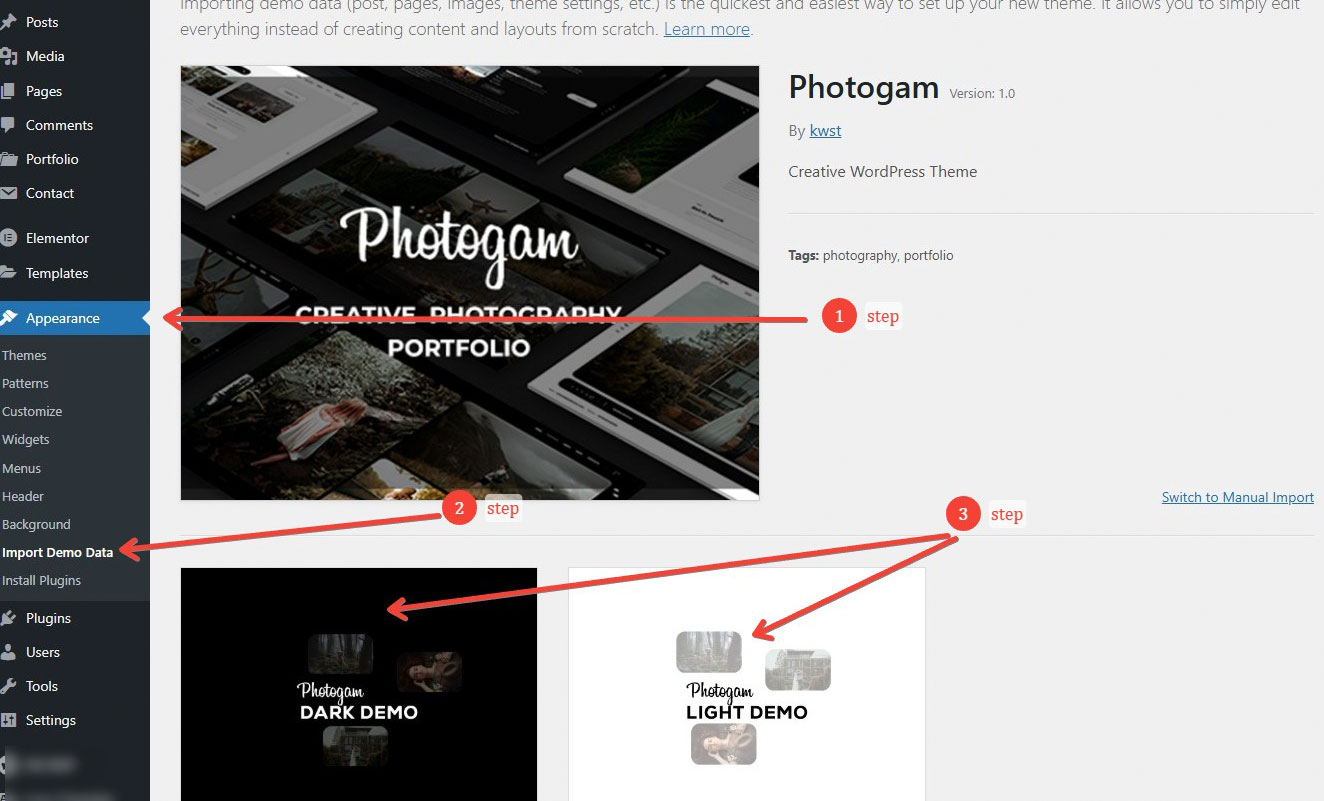
Go to Appearance → Import Demo Data.
Choose your preferred version: Dark Demo or Light Demo
Click Import Demo Data and wait until it finishes.
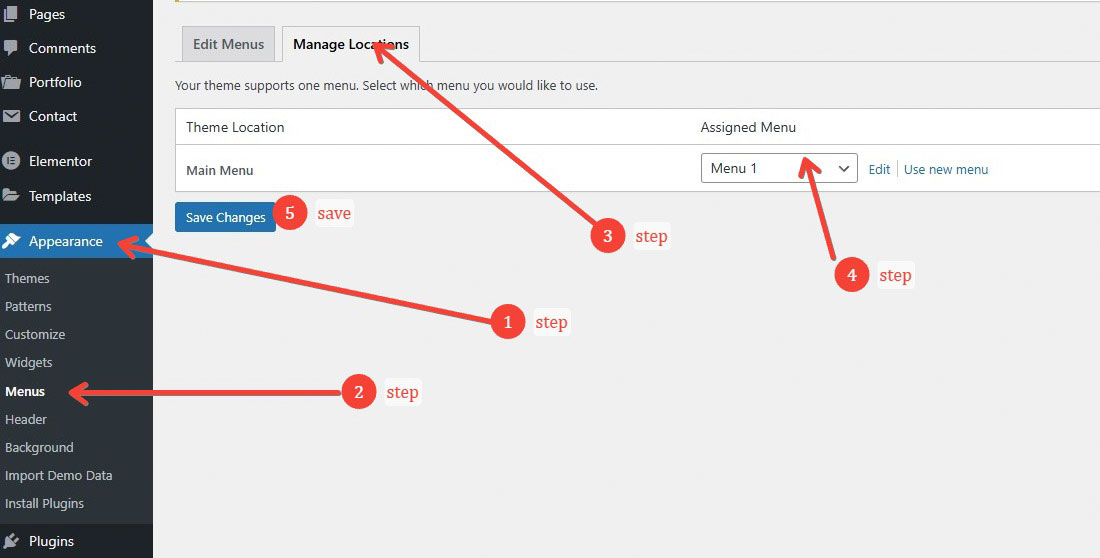
Note: After the import completes, you may notice duplicated menus. To fix this, go to Appearance - Menus, open the Manage Locations tab, and assign Menu 1 to the primary menu location.
The main theme settings are located on the path Appearance - Сustomize

| Setting | Description |
|---|---|
| Preloader / Cursor Settings | Control the preloader display and toggle the animated cursor on or off. |
| Site Identity | Manage the site logo, title, tagline, and favicon. Option to switch to the Classic Editor. |
| Content Settings | Change theme color palette, font families, and column image appearance. |
| Header Settings | Adjust logo size, header layout, and the position of social icons. |
| Blog Settings | Set the number of blog columns, customize post image style, and manage right sidebar elements (e.g., progress bar). |
| Single Post Settings | Customize layout and visual appearance for individual posts. |
| Search Page Settings | Edit the search page text and featured image. |
| Photogam Social Links | Add and manage your social media links displayed in the sidebar and widget areas. |
| Footer Settings | Choose footer layout, add contact info and copyright text, and enable the “Back to Top” button. |
| Sidebar Style | Configure the visual style and layout of the sidebar. |
| Widgets | Includes all standard WordPress widgets plus two custom widgets: Social Links and Latest Posts. Mailchimp subscription widget also available. |
| 404 Page | Customize the content and style of the 404 error page. |
| Colors, Header Image, Background Image, Menus, Additional CSS | Standard WordPress customization options. |
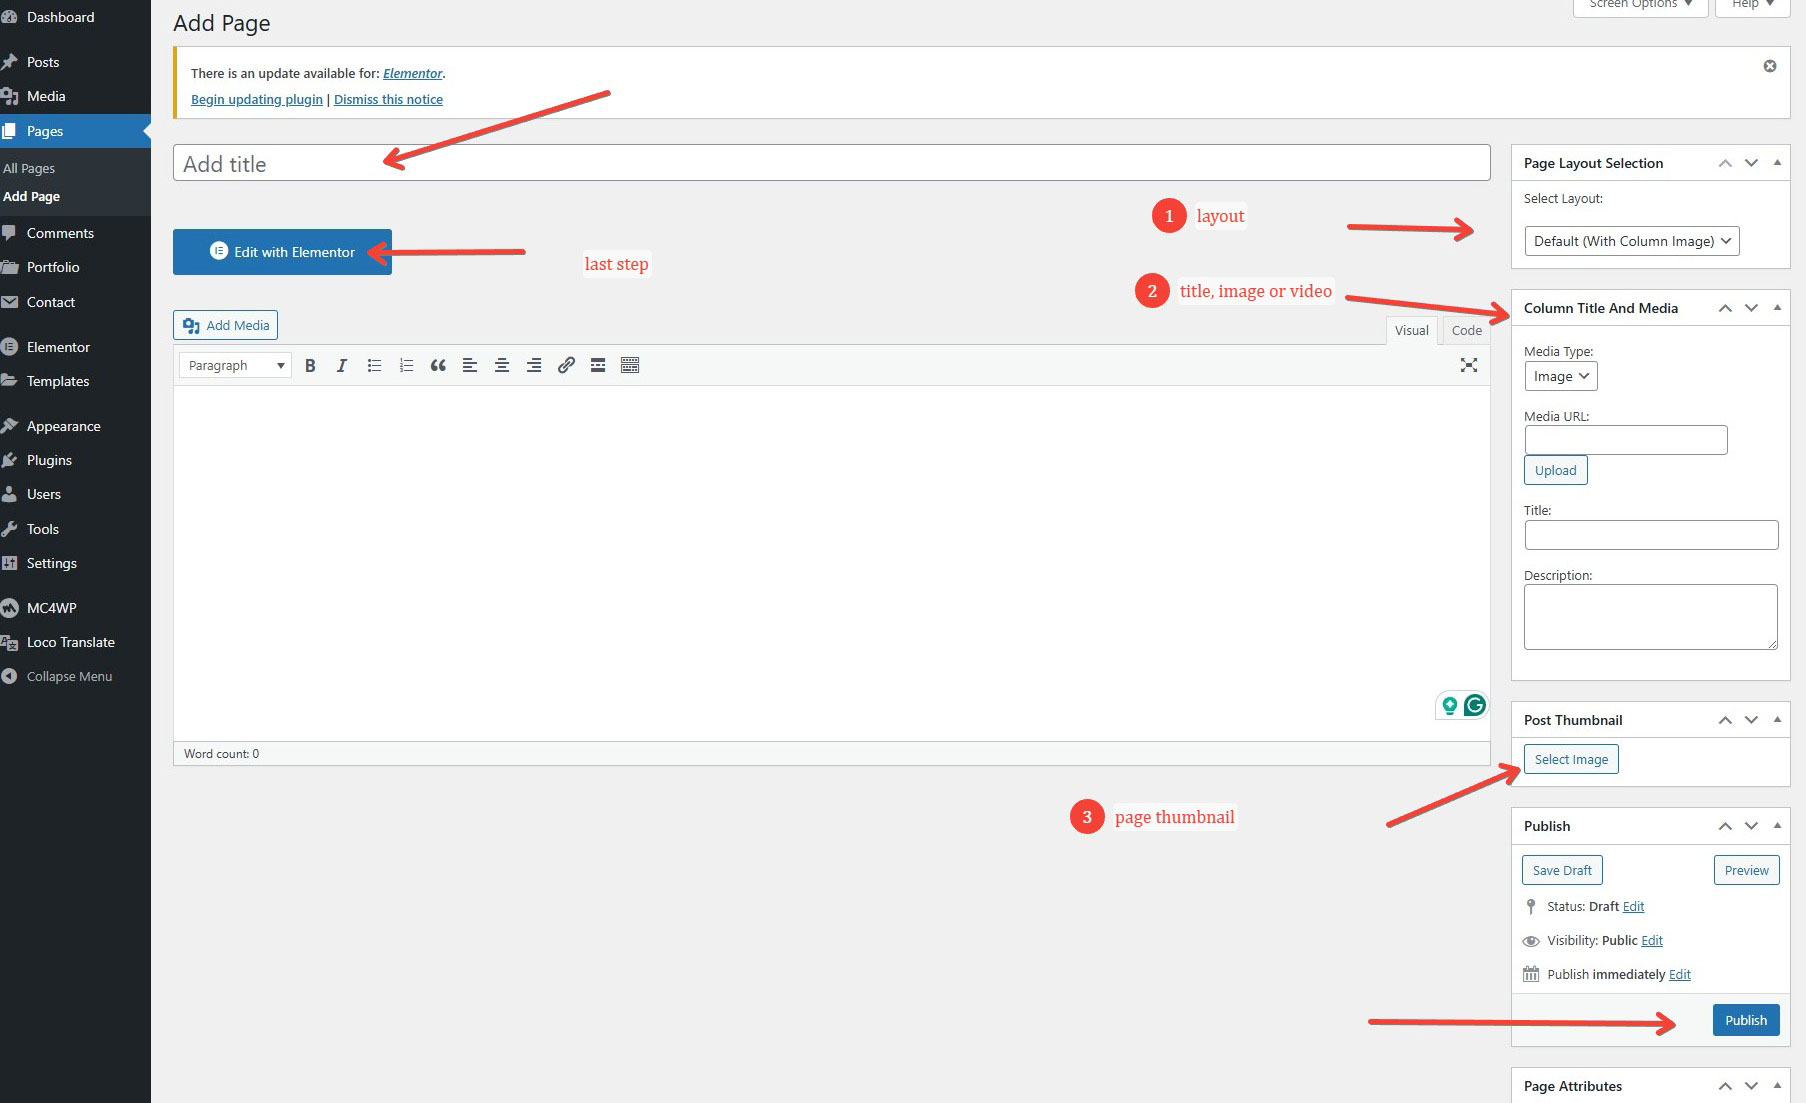
All pages in the Photogam theme are built using the Elementor page builder and the included custom widgets. Follow these steps to create or edit a page:
Note: Some pages, like Home or Portfolio, may require importing demo content first to match the demo layout.
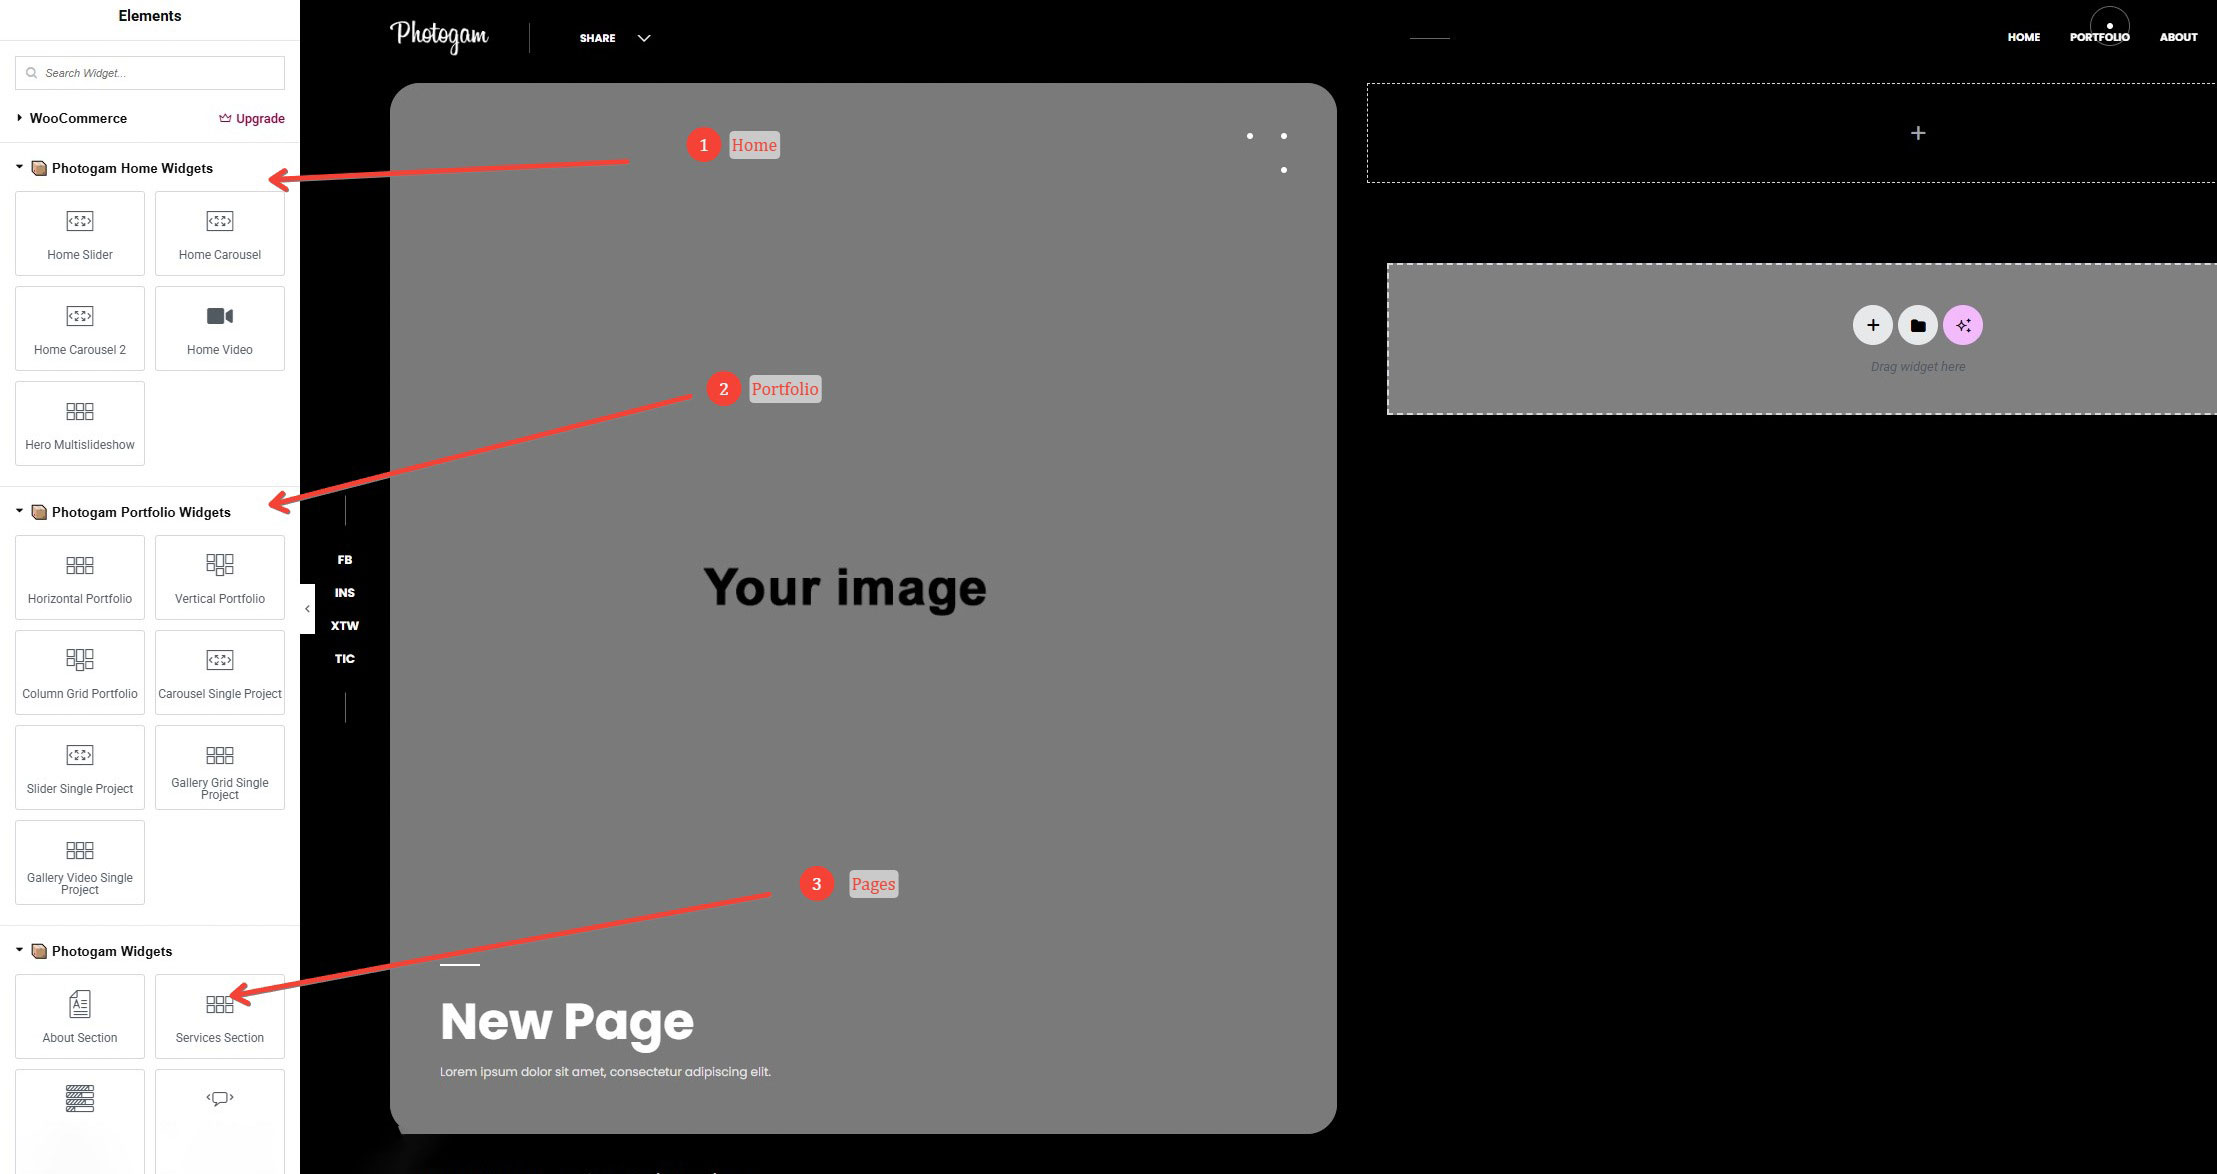
Custom Elementor widgets are divided into three categories:
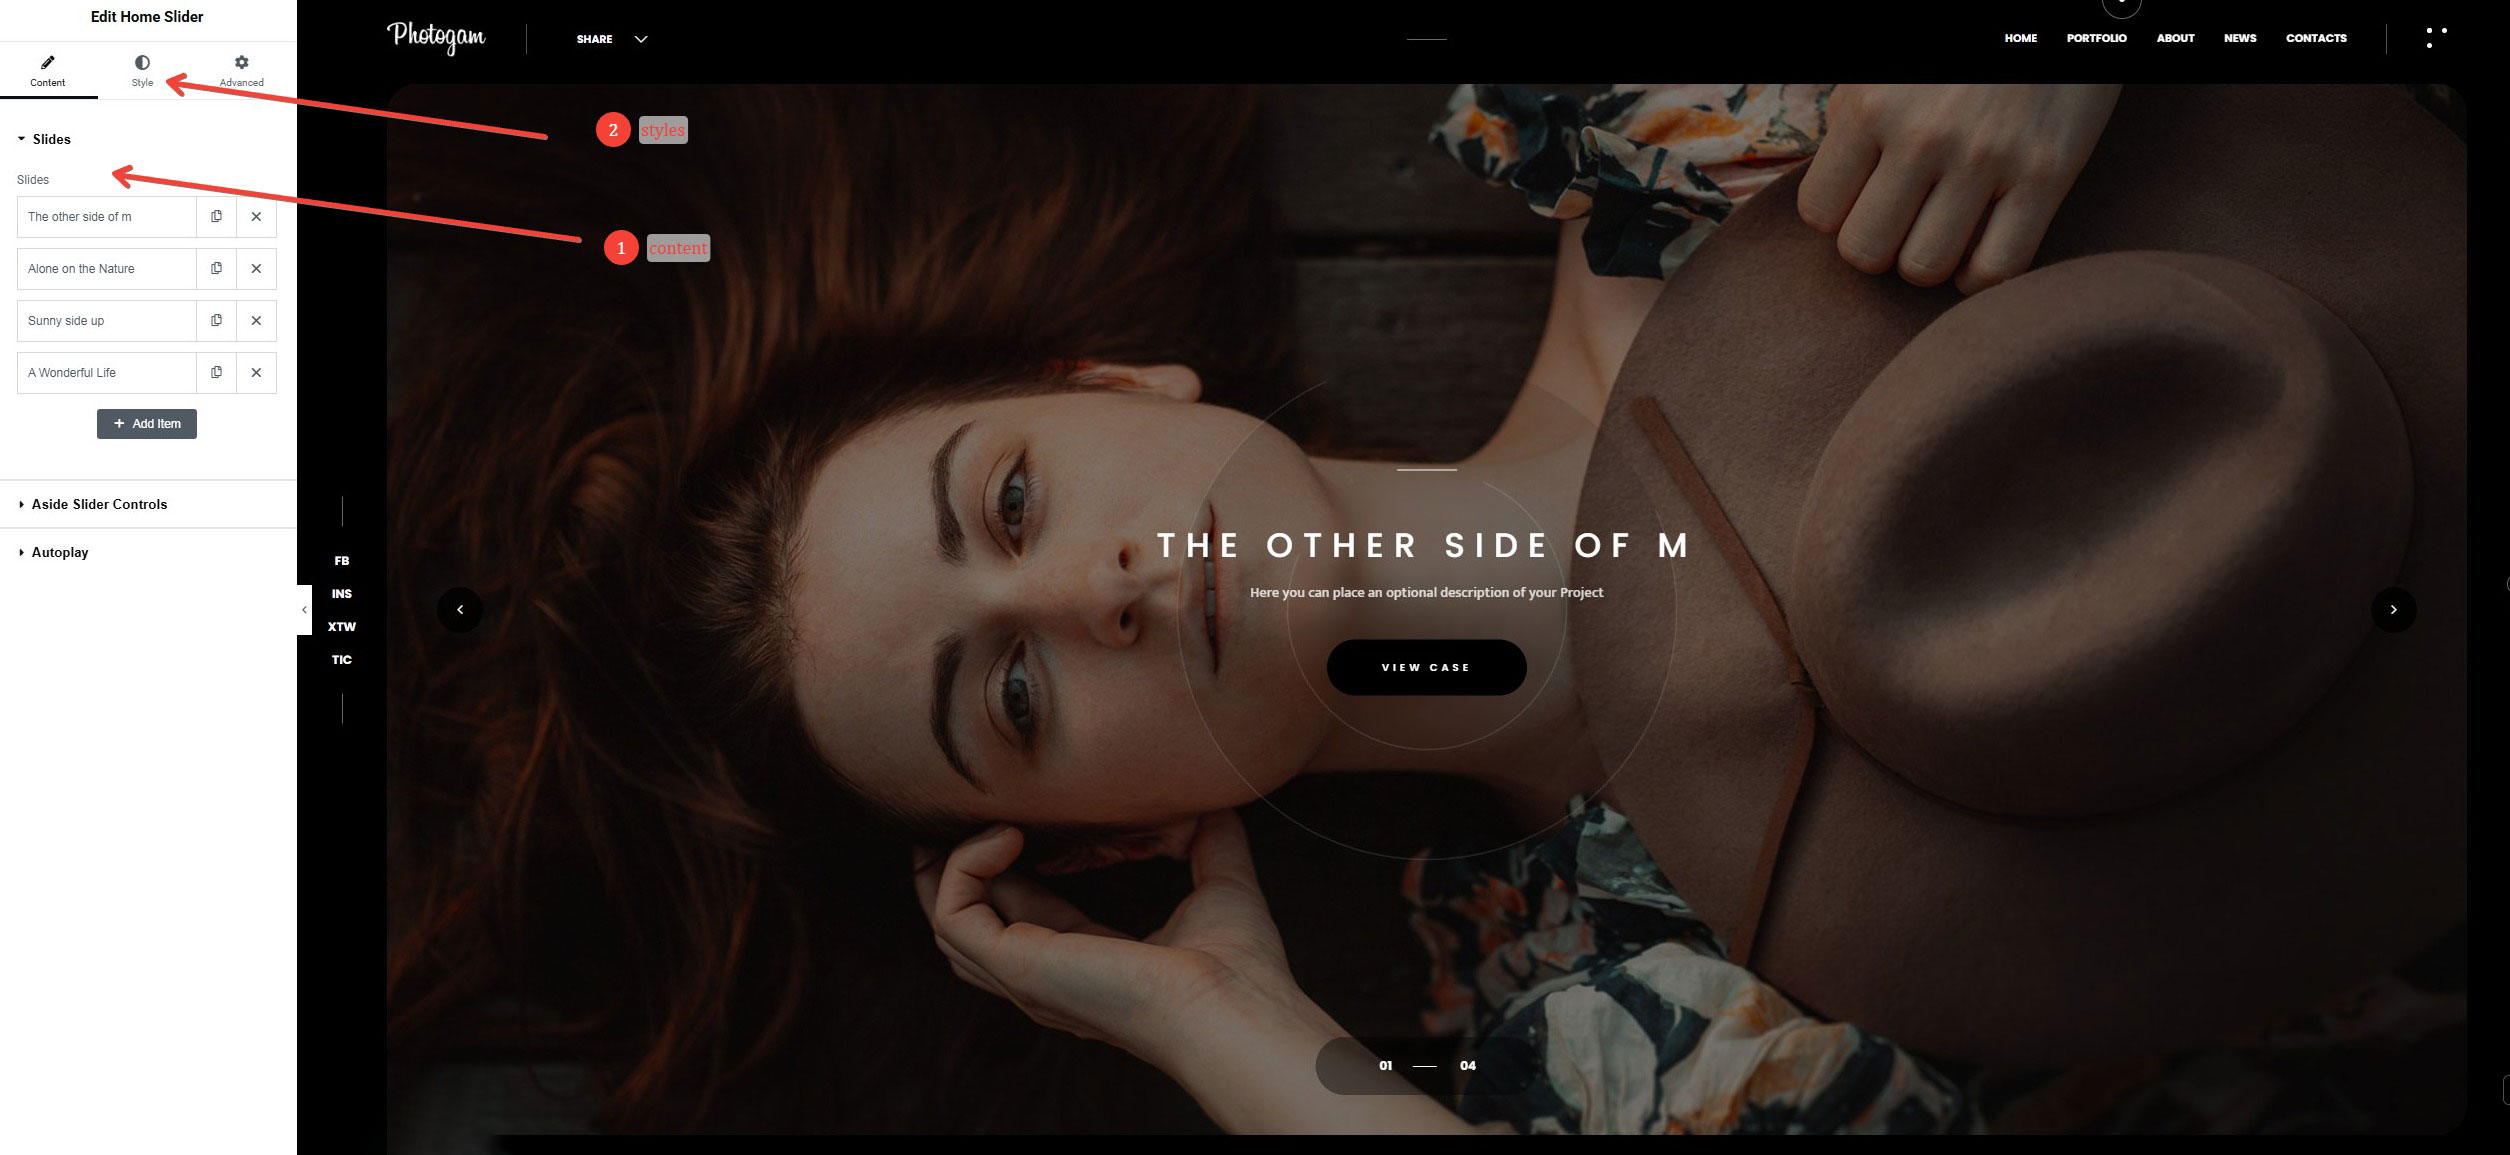
These widgets use the Fullscreen page layout. To use a widget, simply drag it to the page. Inside the widget, you can add slides, videos, descriptions, and customize the style (typography, rounded corners, etc.) in the Style tab.
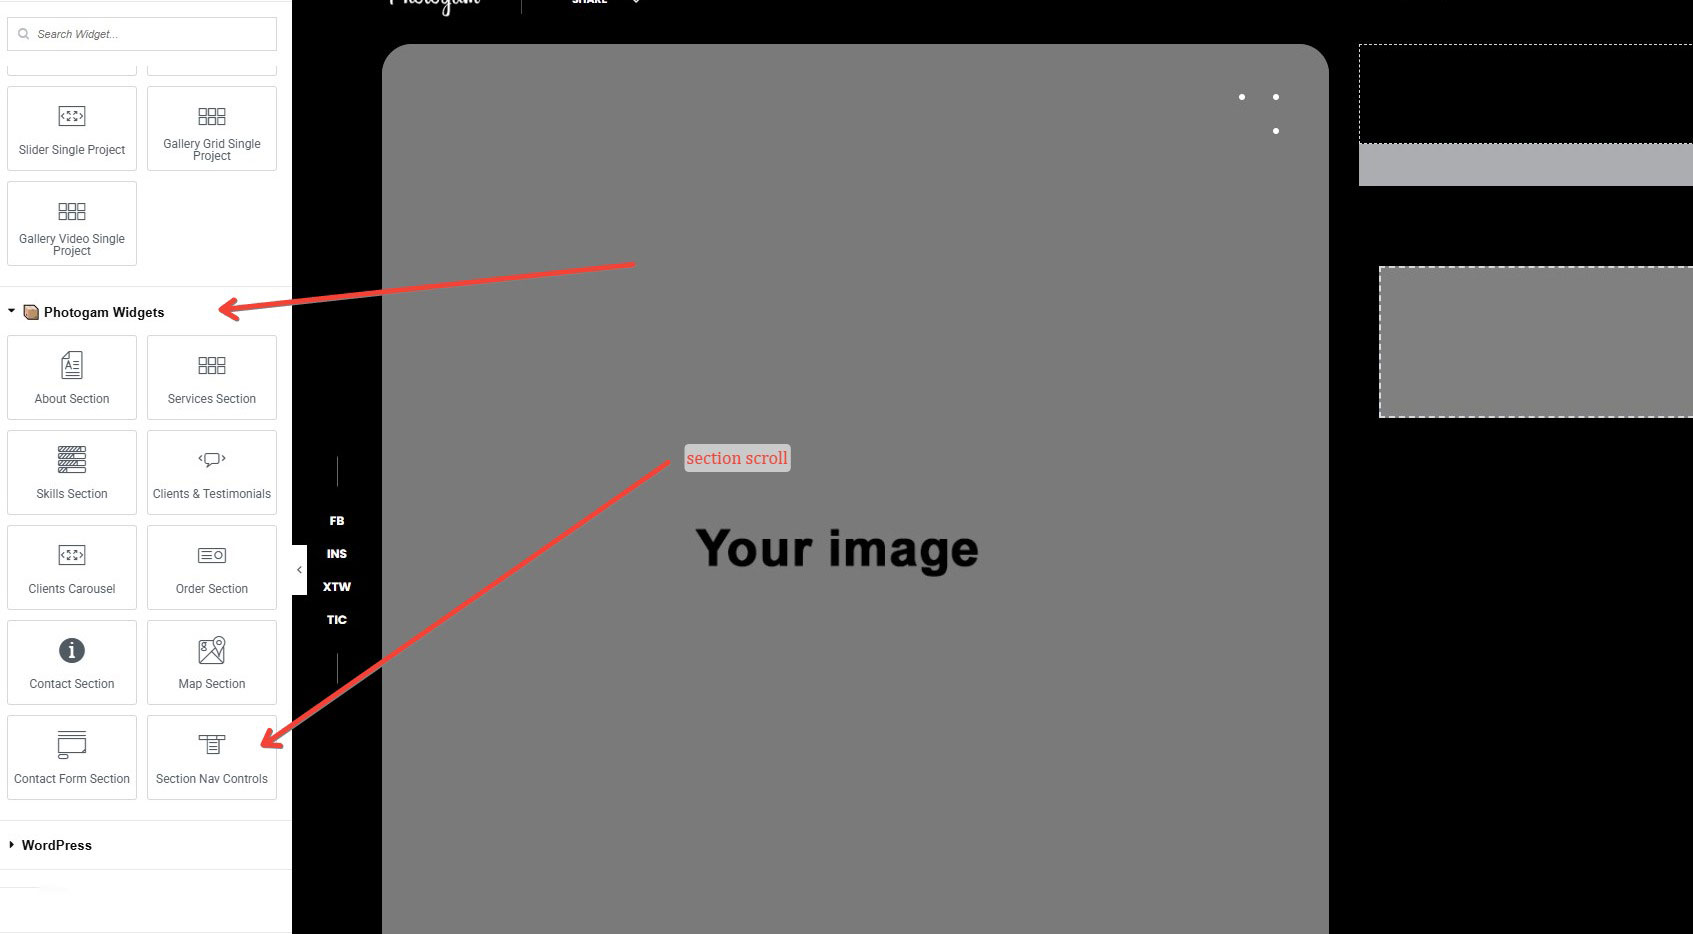
Pages are divided into sections, and widgets correspond to these sections. Drag and drop the desired section widgets one by one. For single-page navigation, use the Section Nav Controls widget. You can choose either a single-page menu or a link to another page.
These widgets are designed to showcase portfolio items. For detailed instructions, please refer to the Portfolio section of this documentation.
Blog pages are managed using the standard WordPress editor. The overall blog layout and individual posts are configured using the Customizer. When creating or editing a post, you can customize media and descriptions.
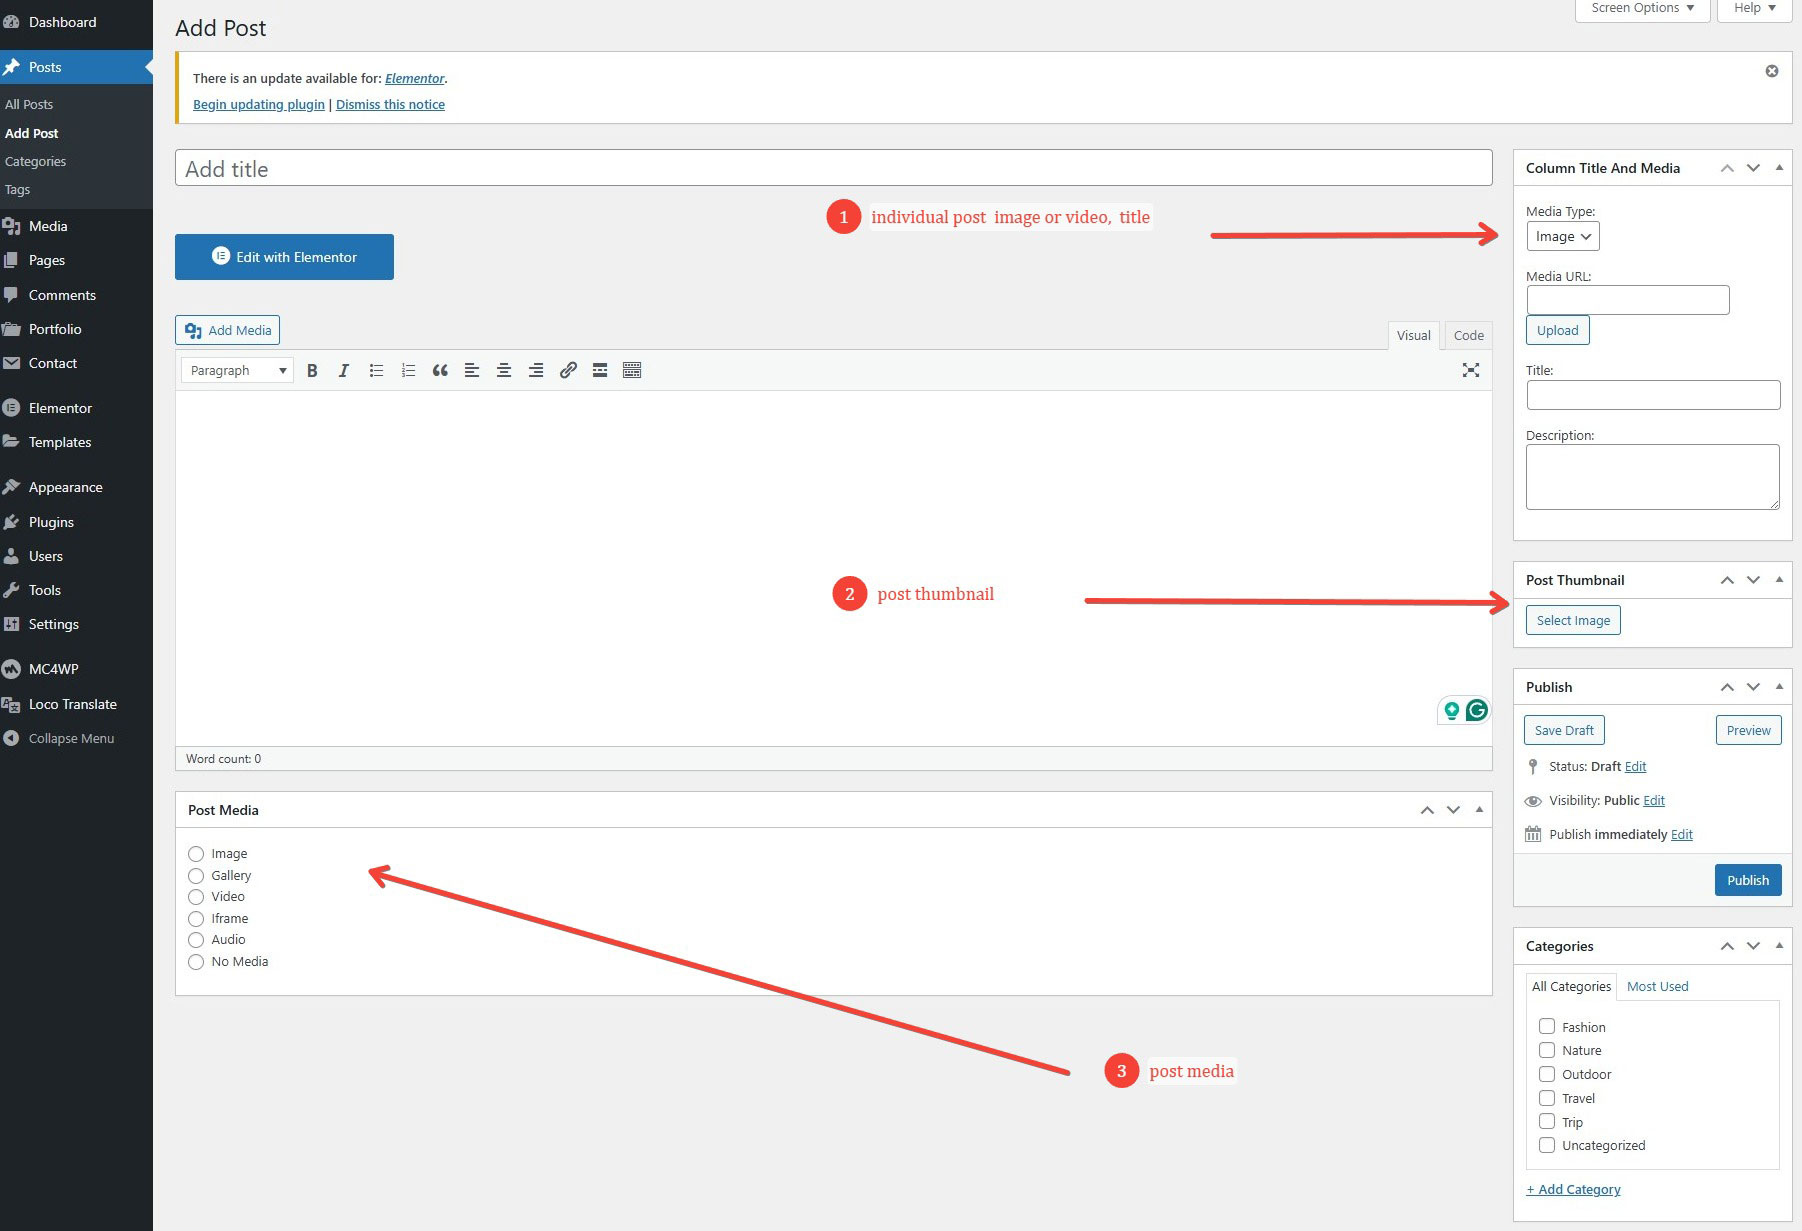
Note: Using the Column Title and Media metabox allows you to create visually appealing blog posts that match the Photogam theme style.
Portfolio pages in the Photogam theme are built using Elementor and the included custom portfolio widgets. To create a portfolio page, follow these steps:
You can display projects in several ways depending on your needs:
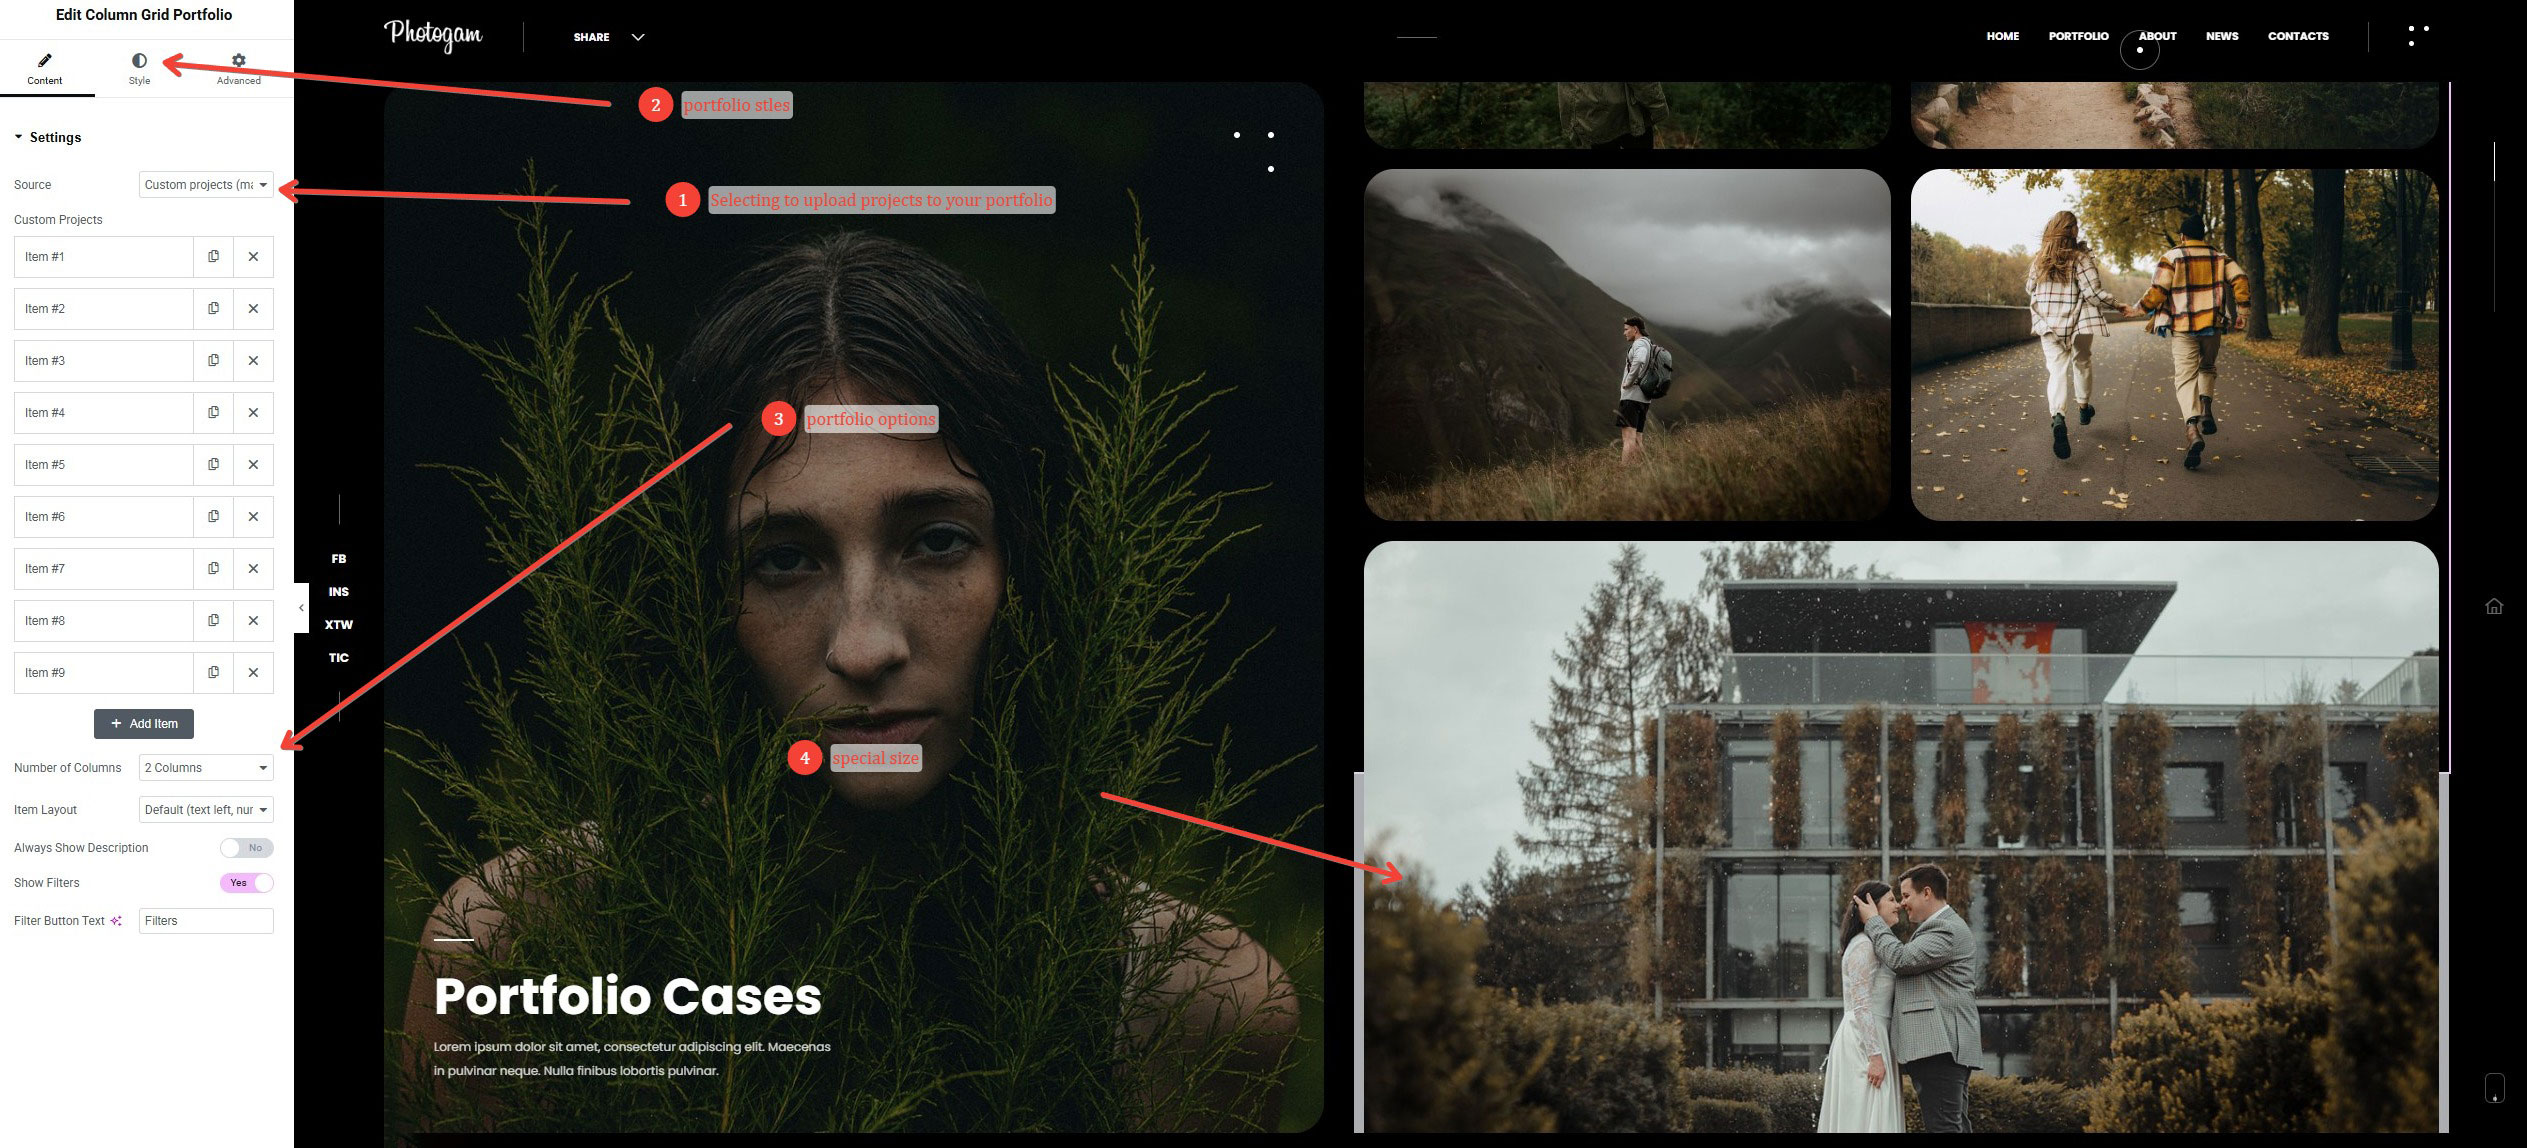
You can also control individual project sizes (increased width or height) depending on the selected portfolio layout.
Single project pages can use one of the following Elementor widgets:
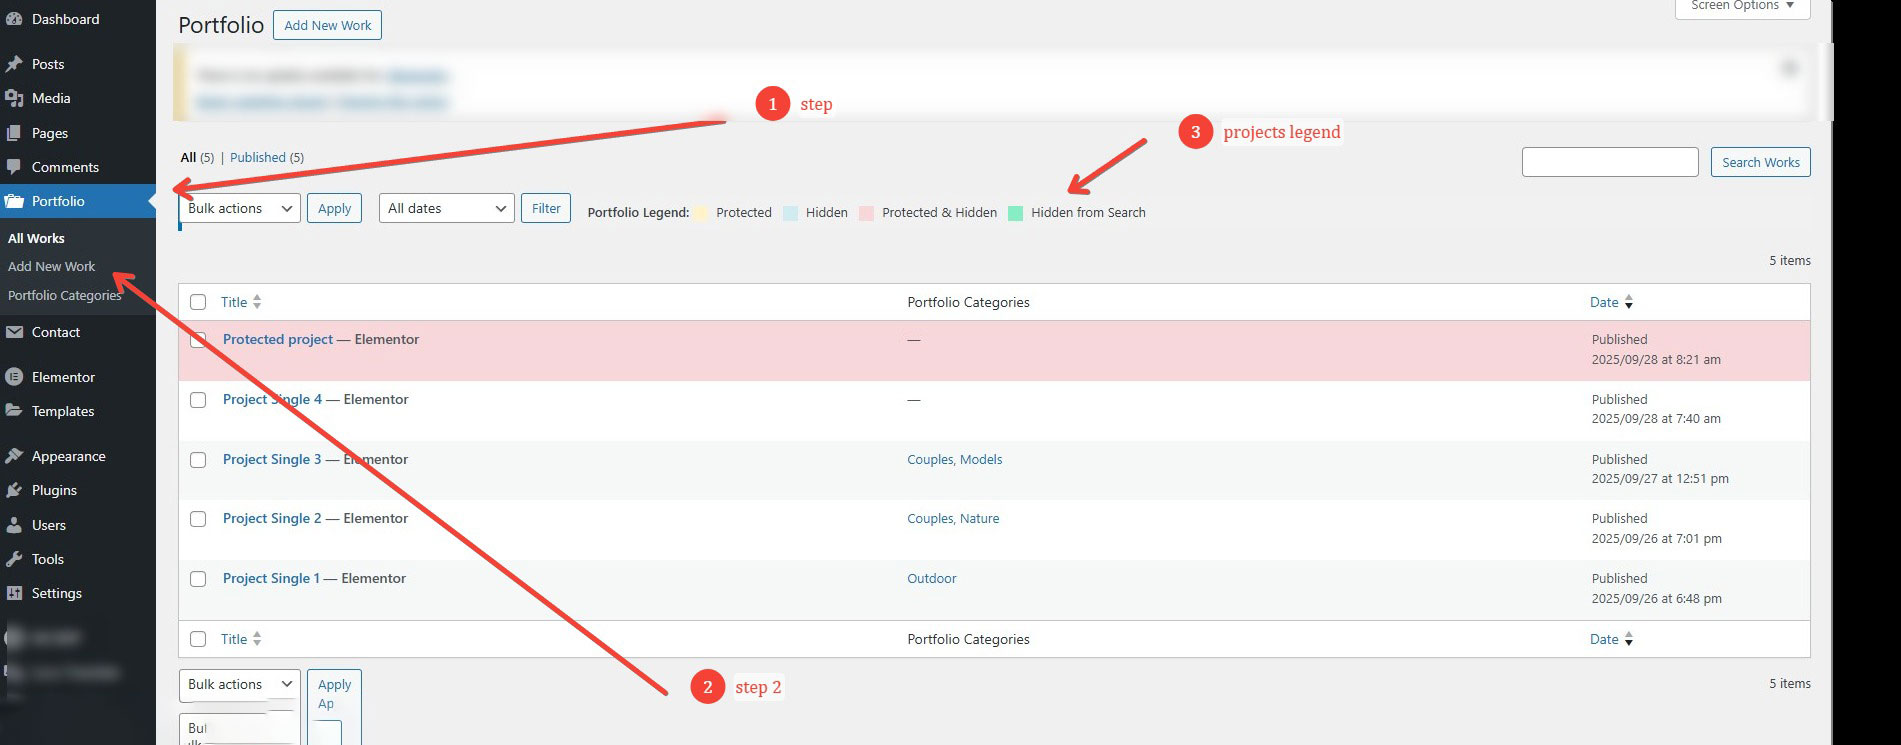
Each project can include media (image, video, or gallery), a detailed description, and extra info such as client name, project date, or category. To create one, go to Dashboard → Portfolio → Add New, configure the metabox options, and click Edit with Elementor. The editing process is the same as for a regular page.
You can also assign one or more categories to each project under Portfolio → Categories. This is required if you plan to use portfolio filters or automatic project loading. For manual projects added through widgets, categories can be set directly inside the widget editor.
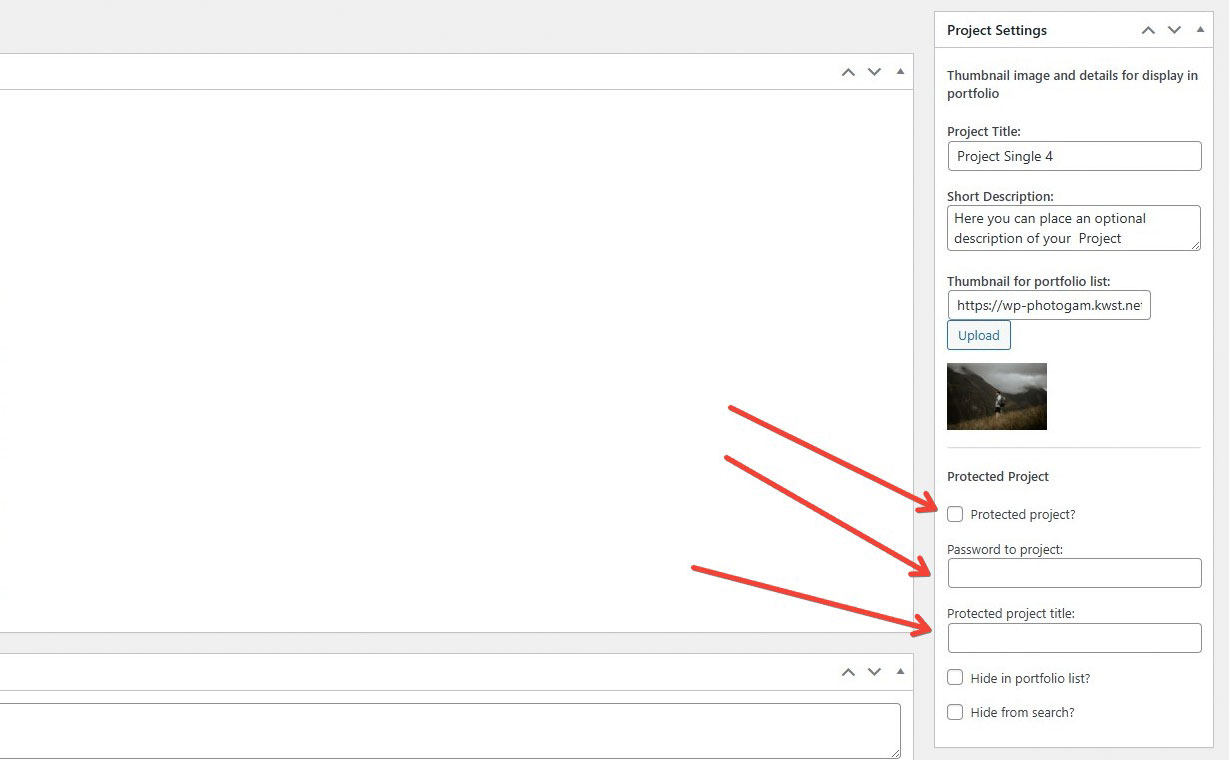
You can also password-protect any of your projects — useful if you want to show a project only to a specific client. Simply enable the Password Protected option in the project settings and set a password.
To create or edit a contact form:
1. Go to Dashboard - Contact - Add New.
2. Add the following code in the Form tab:
Click Save.
The form is now ready. You can also customize response messages in the
Messages tab.
1. Go to Dashboard → MC4WP → Mailchimp and connect your Mailchimp account by entering your API key.
2. You can get your API key from your Mailchimp account under
Profile → Extras → API Keys.
3. Once connected, go to MC4WP → Form and create a new subscription form or use the default one.
4. Copy and paste the following code into the Form code area:
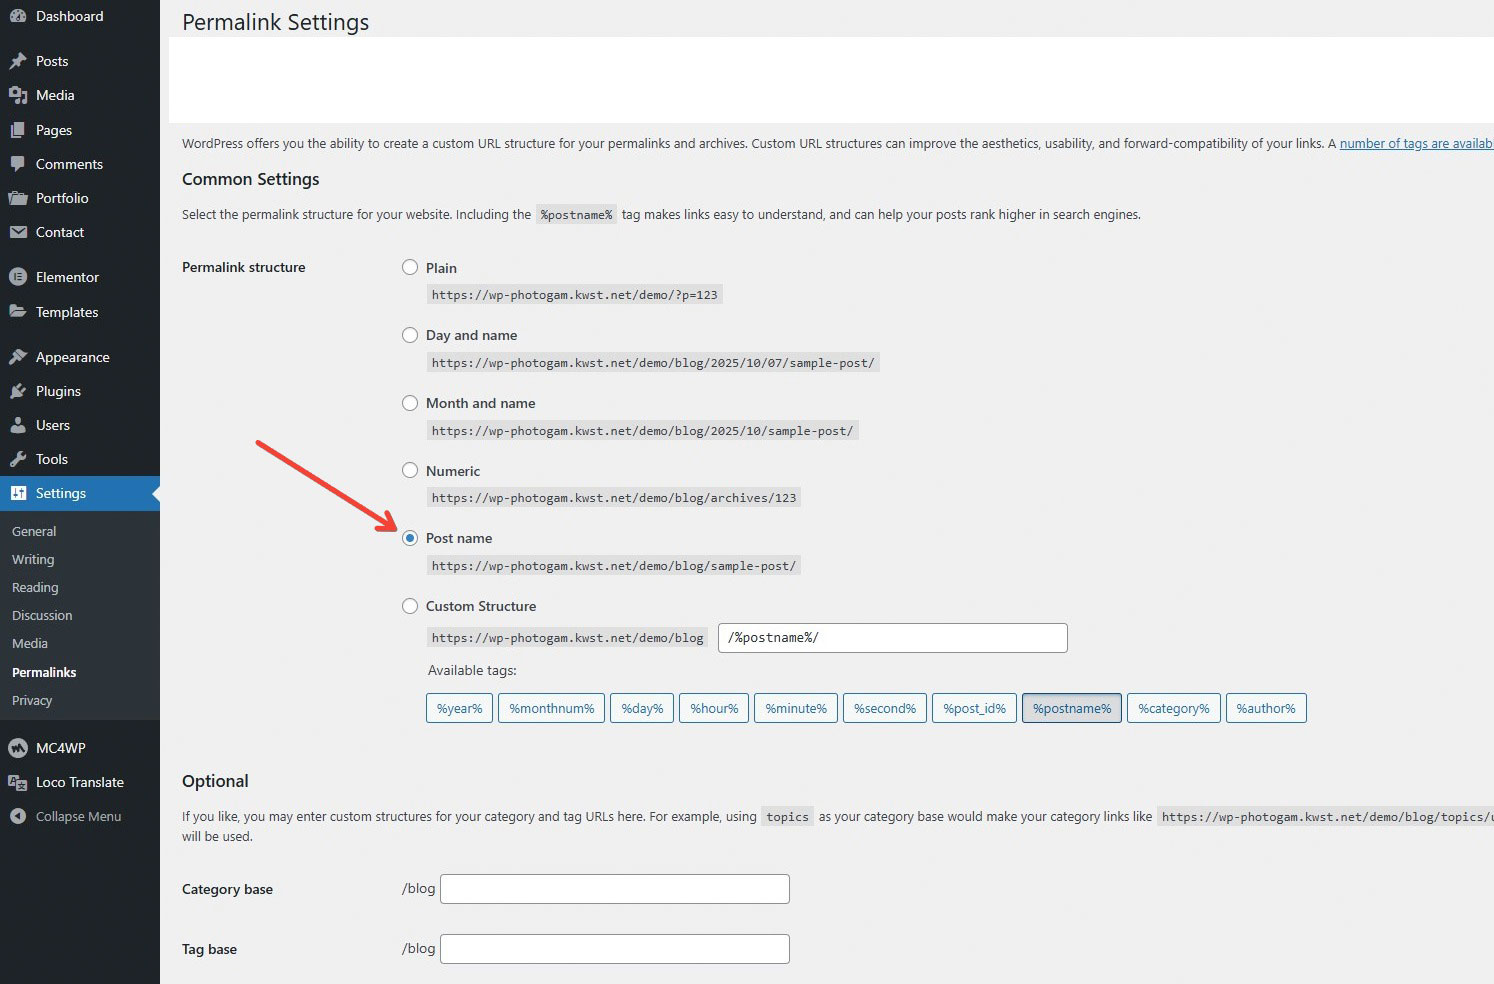
By default, WordPress uses URLs like http://example.com/?p=123, which are not SEO-friendly. Most website owners prefer using Pretty Permalinks — clean and readable URLs that include keywords such as post names, categories, or tags. These help improve both search engine optimization and user experience.
To set up permalinks for your WordPress site, go to Dashboard → Settings → Permalinks. You will see several structure options, such as:
For best results, choose the Post name option and click Save Changes.
Photogam is fully translation-ready.
You can use Loco Translate or Poedit to translate the theme into your language.
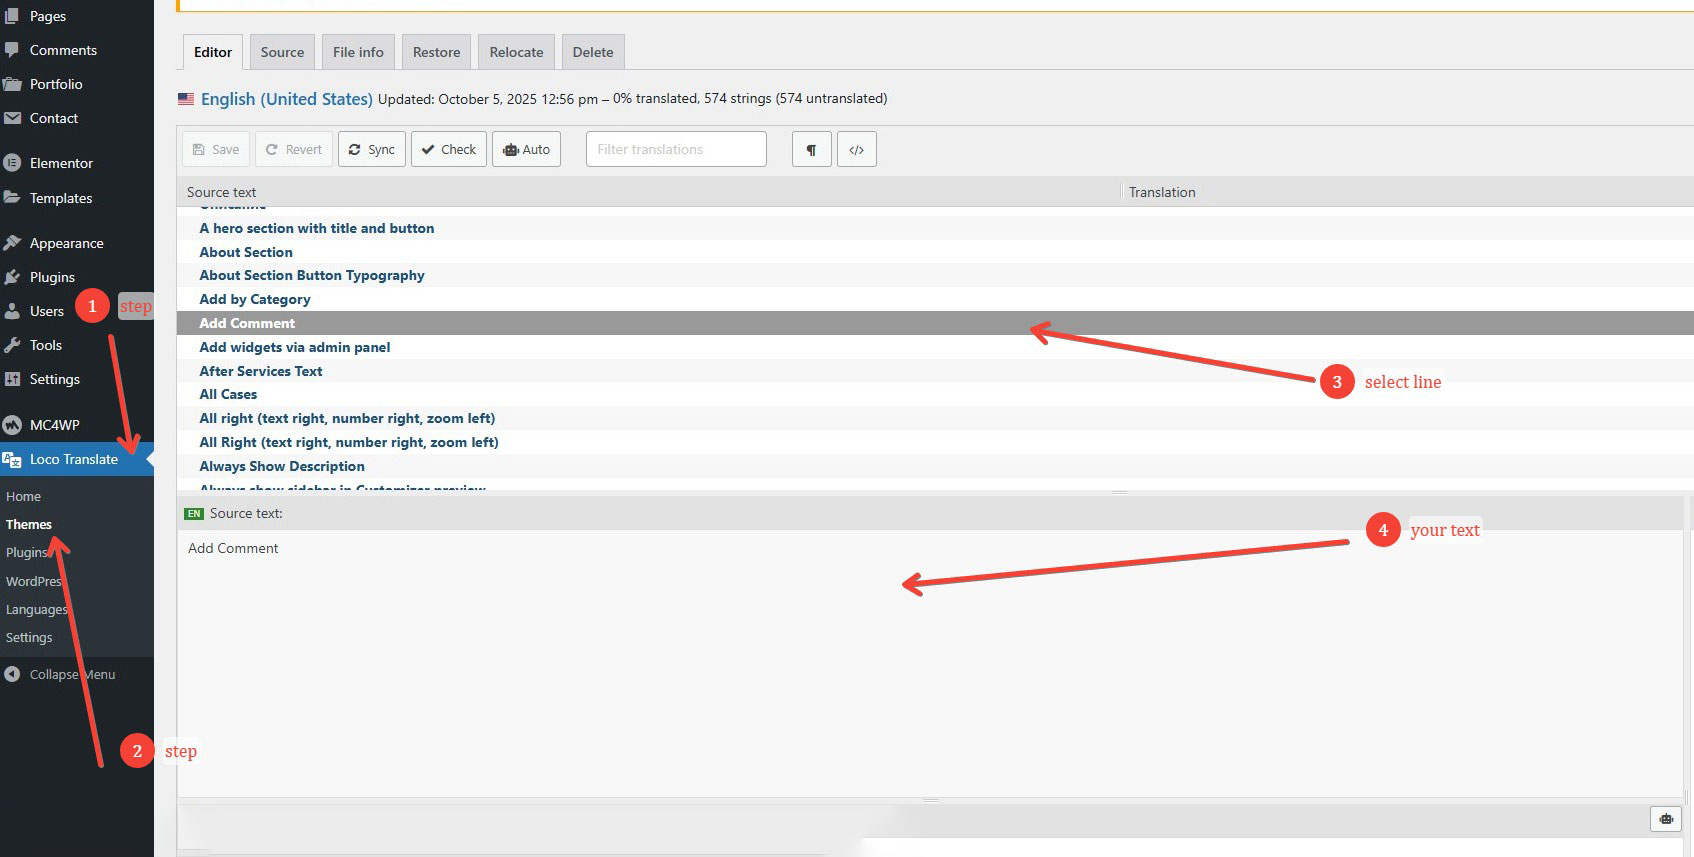
You can also translate the theme’s companion plugin: photogam-theme-pack
To safely modify or extend theme functionality without losing your changes during updates, use the Photogam Child theme.
This is the recommended method for making any design or code changes.
Fonts
Google Fonts
Images
Unsplash
Pexels
(Used for demo purposes only — not included in the download package)
Plugins & Scripts
All third-party assets are used under their respective licenses.